In my own developer package repository, and in merge requests I have made recently to official Exherbo repositories, I have started to include Manifest files alongside the Exheres packaging. This post is an attempt to document how I have the tooling set up for semi-automatically generating manifests.
The cave tool includes a cave digest subcommand which inherits the manifest generation code which had originally been developed for Gentoo. It can be used with Exherbo, but it requires some custom configuration in order to fit with the recommended Exherbo contribution workflow. The two main key points are that the Manifest files need to be generated in the development checkout of the repository (which will usually be in your home directory) instead of the system checkout (under /var/db/paludis), and you will need to override some of the digest generation settings since these aren’t configured in most Exherbo repositories.
What are The Tubes? They were an experimental overlay network for doing, uh, sysadmin LARP? Some public information about the setup could be seen over at pvpn.reclaim.technology (archive link; the network is no longer running). Anyways, as the overlay network grew, we wanted to make the network more mesh-like instead of star-like. And that means we needed a routing protocol.
After considering BGP and OSPF, I found some information about the Babel routing protocol. It promised to be simpler to set up, capable of handling optimal routing in a mesh network, and even has specialized metrics such as RTT-based metrics designed for use on overlay networks like the Tubes.
Here’s a public duplicate of the Tubes-internal document on setting up the Wireguard link and Babel configuration for this usage. This configuration as it stands is not well tested – it’s probably going to change as we bring on more links and find issues!
Babel Routing for the Tubes
The instructions below assume you are using wg-quick style Wireguard configuration, and babeld as your Babel routing daemon. Other tools may be used, but you will have to translate the configuration examples for it.
Configuring a Wireguard link for Babel routing
Wireguard links that will be running Babel routing need some configuration changes to allow the Babel protocol to run over them. Here’s an example configuration for a Wireguard link in wg-quick format.
[Interface]
# Leave the PrivateKey, ListenPort
# options unchanged from the normal configuration

# Assign an IPv6 link local address on the tunnel so multicast works
# This address must be distinct from the remote side! Consider using your
# participant number for the address.
Address = fe80::XX/64
# Also configure your router's local addresses on this interface
Address = 10.42.N.1, fd70:feed:cafe:XX00::1

# Disable automatically adding routes for AllowedIPs. That's Babel's job
Table = off

# An interface used for Babel MUST only have one peer
[Peer]
# Leave the PublicKey, PresharedKey, Endpoint, PersistentKeepalive
# options unchanged from the normal configuration

# Since we're doing mesh routing, allow all Tubes IPv4 & IPv6 addresses
AllowedIPs = 10.42.0.0/16, fd70:feed:cafe::/48

# The Babel protocol uses IPv6 link-local unicast and multicast addresses
AllowedIPs = fe80::/64, ff02::1:6/128
When this Wireguard link is running, there should be no IPv4 routes shown in ip route with dev wgN. There should be one IPv6 route shown with ip -6 route on the Wireguard device, for the link local range: fe80::/64 dev wgN proto kernel metric 256 pref medium
Configuring babeld
The babeld configuration file is usually located at /etc/babeld.conf
# Set default options that will apply to all wireguard interfaces
# Tunnel mode enables timestamps and RTT metrics
default type tunnel
# An optimization for point-to-point or wired links
default split-horizon true
# Override this to false on a specific interface if the remote node is
# close enough to have wifi interference on routed subnets.
default faraway true
# Prefer using unicast messages over the tunnel
default unicast true

# For each Wireguard interface that will be running babel, add an interface line:
interface wgN

# To protect against misconfigured remote Babel nodes, reject prefixes
# in the wrong subnet, or with the wrong prefix length.
in ip fd70:feed:cafe::/48 le 64 ge 56 allow
in ip fd70:feed:cafe::/56 eq 128 allow
in ip 10.42.0.0/16 eq 24 allow
in ip 10.42.0.0/24 eq 32 allow
in deny

# Advertise locally configured routes in the Tubes ranges
redistribute ip fd70:feed:cafe::/48 le 64 ge 56 allow
redistribute ip fd70:feed:cafe::/56 eq 128 allow
# If you are redistributing subnets on behalf of wireguard-connected
# peers who aren't using babel, increase the metrics for those subnets
#redistribute ip 10.42.1.0/24 eq 24 metric 256
redistribute ip 10.42.0.0/16 eq 24 allow
redistribute ip 10.42.0.0/24 eq 32 allow
redistribute local ip 10.42.0.0/24 eq 32 allow
redistribute local deny
If you send the running babeld process SIGUSR1, it will print out the list of known routes to the log. Please use this to verify that it has imported the correct local routes – marked (exported) – before linking to another node.
If Babel is not exporting your subnet address, there’s a couple possible reasons:
If you have a route for the subnet address, but the output of the ip route (or ip -6 route) command does not include a proto keyword, then it’s probably proto boot, and is excluded by default in babel. You can add the appropriate IPv4 or v6 lines to the redistribute section of the babel config to include that route:
redistribute ip 10.42.0.0/16 proto 3 eq 24 allow
redistribute ip fd70:feed:cafe::/48 proto 3 le 64 ge 56 allow
Alternately, maybe you don’t have a single route configured covering the entire subnet – for example, if you are assigning individual addresses in a VPN concentrator, or are using smaller subnet sizes. In this case, consider adding local “unreachable” routes that cover your entire subnet for babeld to pick up:
ip route add unreachable 10.42.N.0/24
ip -6 route add unreachable fd70:feed:cafe:XX00::/56
Disabling transit traffic
If you want to use babel to automatically receive routes, but do not want to allow traffic to different systems to transit through your system, you can configure that by using out filters in the babel config:
# Allow announcing routes for your own local subnets
out ip 10.42.N.0/24 allow
out ip fd70:feed:cafe:XX00::/56 allow
# Don't announce routes to anything else
out deny
Important: This only applies to Synaptics touchpads, not ALPS!OctoPerf’s T440p buyer’s guide includes some hints on how to tell them apart.
This is a simplified version of the instructions based on Nick Heim’s blog post which goes through the process of how the registry file below was created.
So, most of the instructions for setting up the 3-button touchpad on a T440p to get proper trackpoint buttons are unnecessarily complicated. They’ll ask you to reboot into safe mode to install an unsigned modified driver, or install an old then new driver in a specific order, and make sure you disable windows updates to avoid an update breaking things. But! There is an easier way!
Install the latest Synaptics driver for the T440p or the T450. It doesn’t matter where you get it from; the driver installed by Lenovo System Update automatically on the T440p will work, but I recommend manually installing the latest T450 driver from Lenovo’s support page instead.
Reboot to complete the installation.
Save the registry file contents below to a .reg file (e.g. touchpadbuttons.reg) using a text editor like notepad, and double-click it to apply the settings. You will be prompted for administrative access and confirm that you’d like to apply the settings.
Reboot to apply the new settings.
Tada! Everything works! You’re done.
Keep the registry file saved somewhere; if the touchpad buttons ever stop working after a driver update, you can just re-apply it and reboot to fix the settings.
The registry file contents to use are here:
Windows Registry Editor Version 5.00
[HKEY_LOCAL_MACHINE\SYSTEM\CurrentControlSet\Services\SynTP\Parameters]
"ExtraCapabilities7Add"=dword:00010000
"ExtraCapabilities7Mask"=dword:FFFFFFFF
"ProcessUnexpectedResetDuringDetection"=dword:00000001

[HKEY_LOCAL_MACHINE\SOFTWARE\Synaptics\SynTP\Defaults]
"SlaveLeftButtonZoneR"=dword:00000d80
"SlaveLeftButtonZoneB"=dword:00000f40
"SlaveRightButtonZoneL"=dword:00000d81
"SlaveRightButtonZoneB"=dword:00000f40
"SlaveMiddleButtonZoneL"=dword:00000b57
"SlaveMiddleButtonZoneR"=dword:00000fa9
"SlaveMiddleButtonZoneB"=dword:0000112e

[HKEY_LOCAL_MACHINE\SOFTWARE\Synaptics\SynTPEnh]
"ScrollMethod"=dword:00000005
"SynapticsScrollMethodSpeedFactor"=dword:00005000
How does this work? See Nick Heim’s blog post for details. But to summarize – the only difference between the installations for the different touchpads is the registry settings. Rather than modify the driver inf file so it chooses different registry settings, you can just manually update the registry after installation.
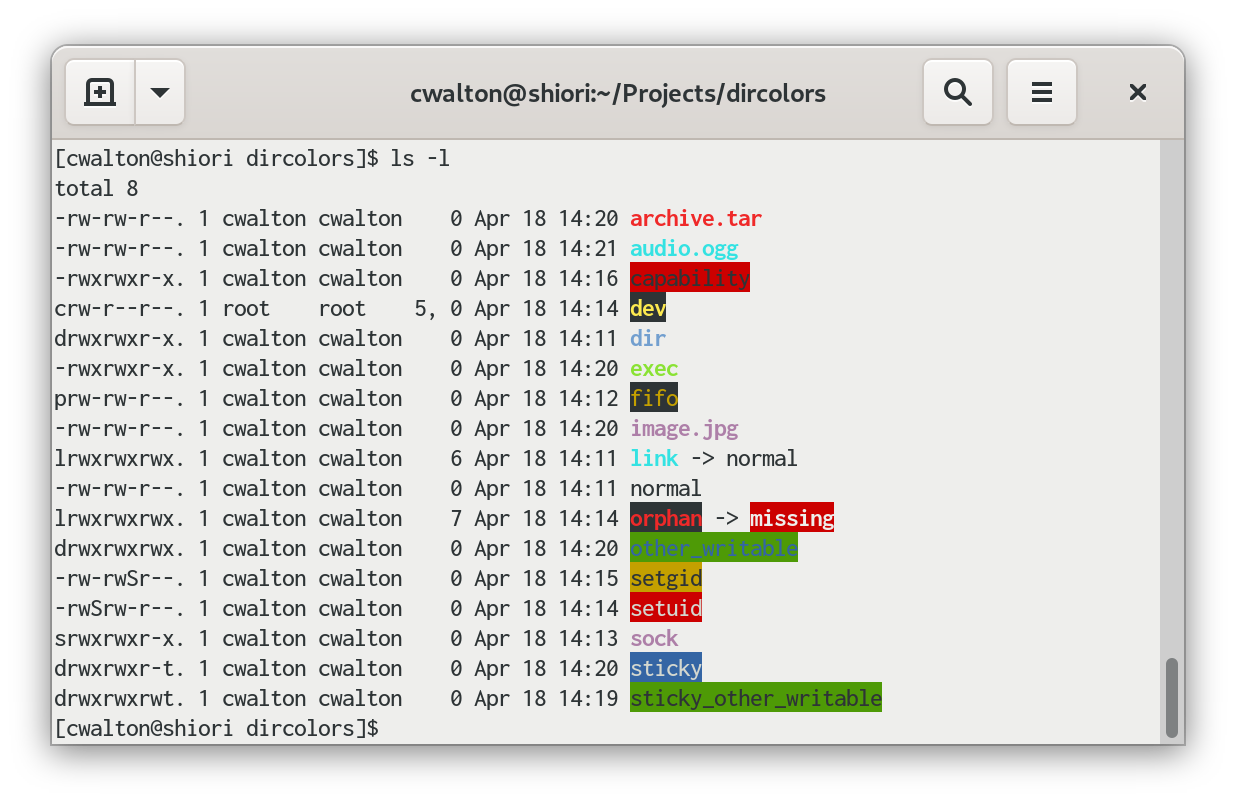
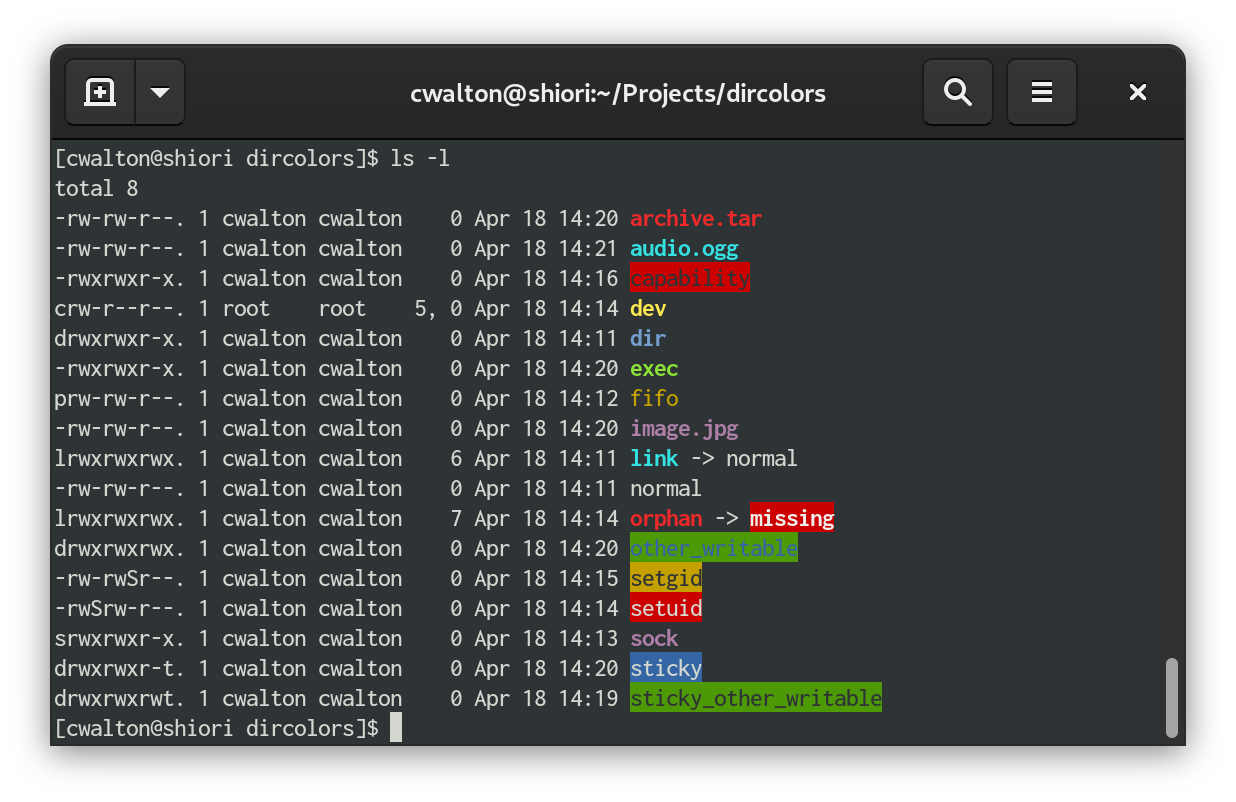
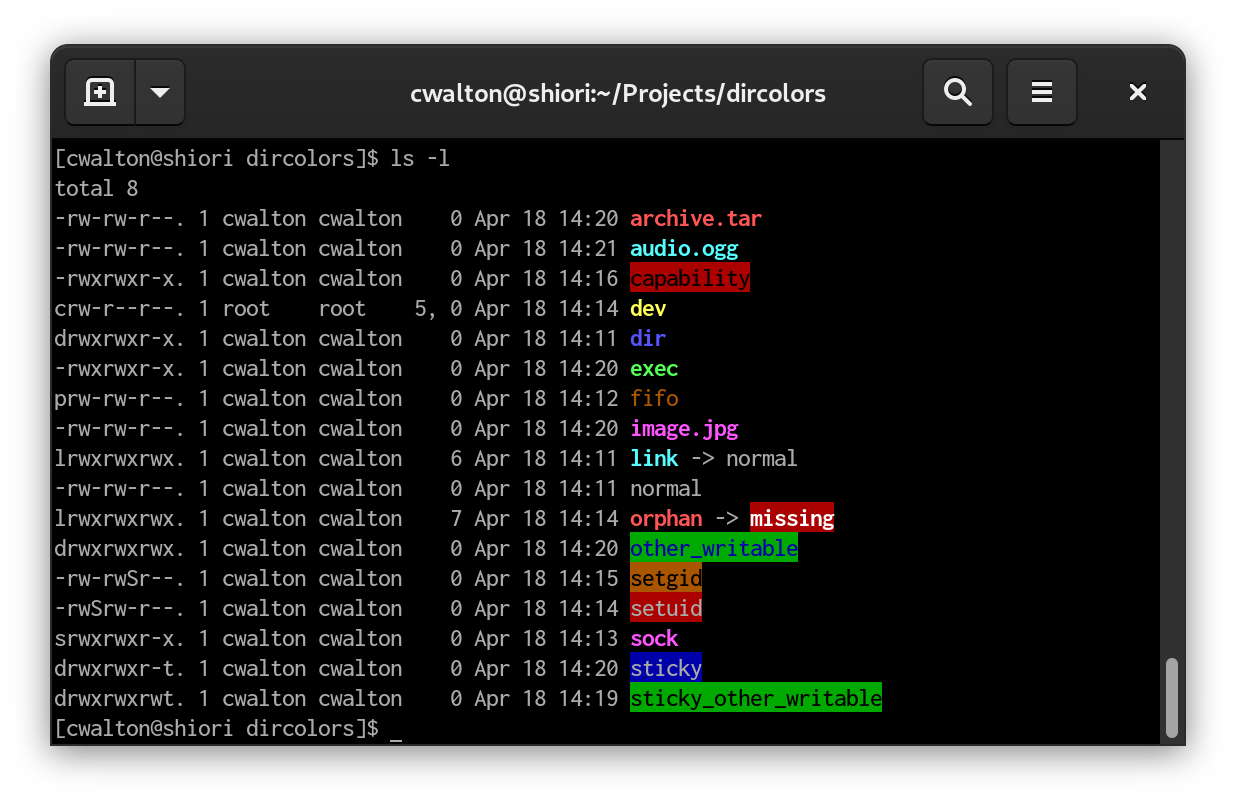
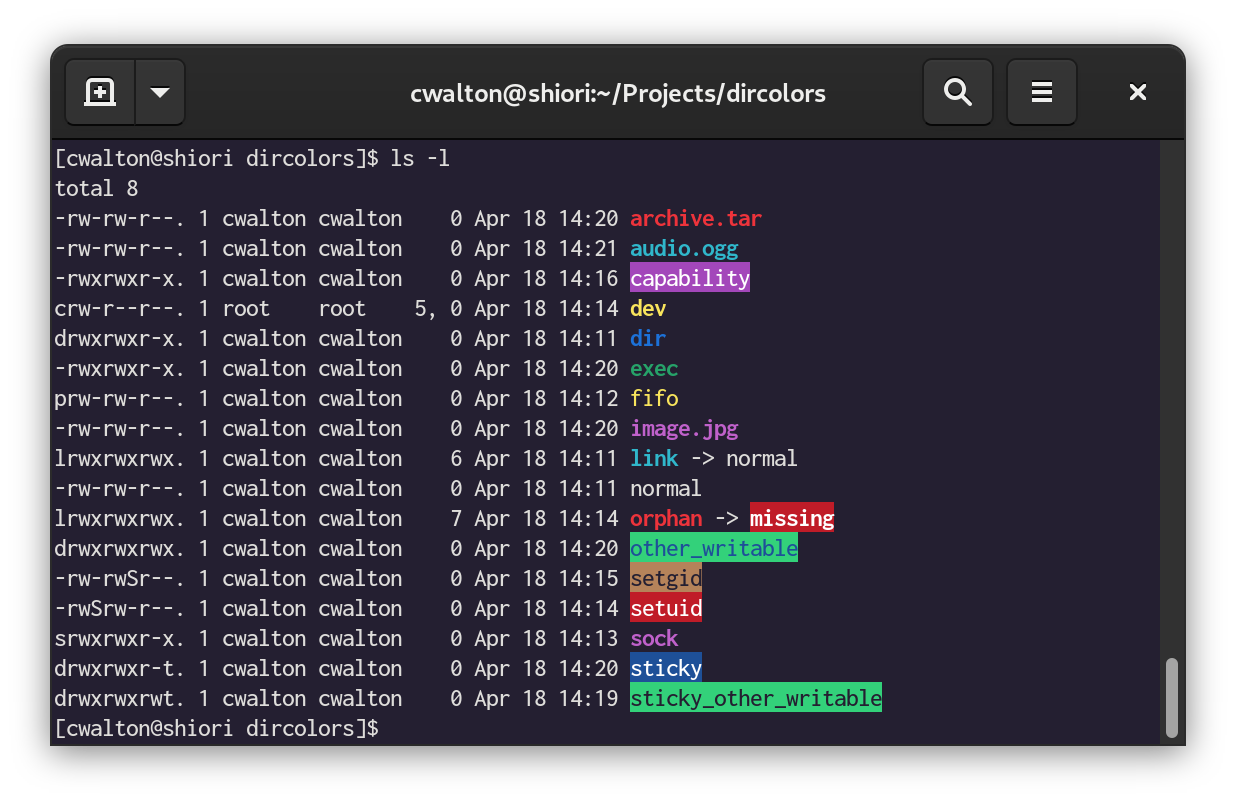
A quick run through of how various GNOME terminal palettes look like with the 8-color+bold DIR_COLORS file shipped with coreutils and used by many Linux distributions.
GNOME Tango Light (first) and Dark (second), using “Show bold text in bright colors” (default in older GNOME releases)
Tango is a fairly light value but low saturation palette. The light background is an odd off-white shade that reduces contrast. When the “Show bold text in bright colors” option is enabled, bright cyan and bright green over the light background have minimal contrast. When using a dark background, the palette gives reasonable results, but the highly saturated red as used in archive files is problematic.
The contrast of blue over green used in the “other_writable” directory is very low.
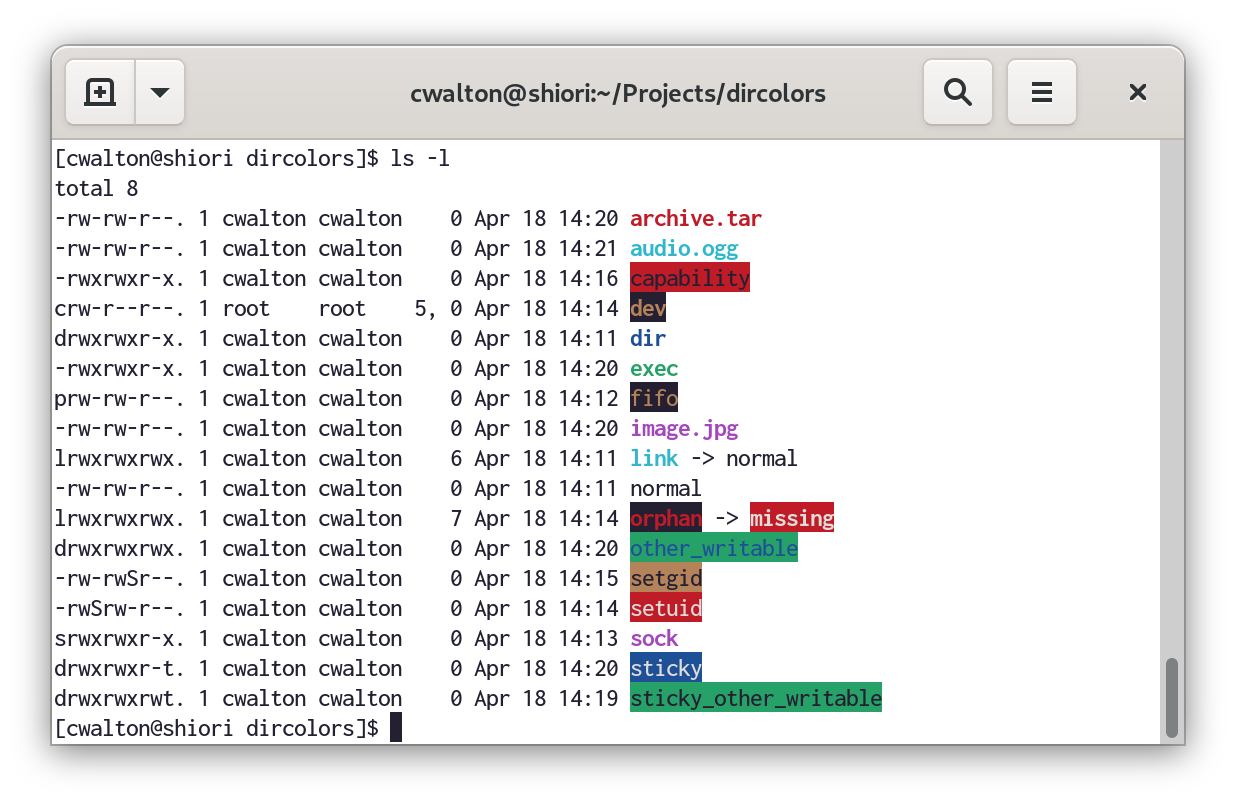
GNOME Tango Light (left) and Dark (right) with “Show bold text in bright colors” disabled.
Disabling the bright-is-bold option improves the contrast in light mode, but in dark mode the dark red, blue, and purple colours are now too close to the background color.
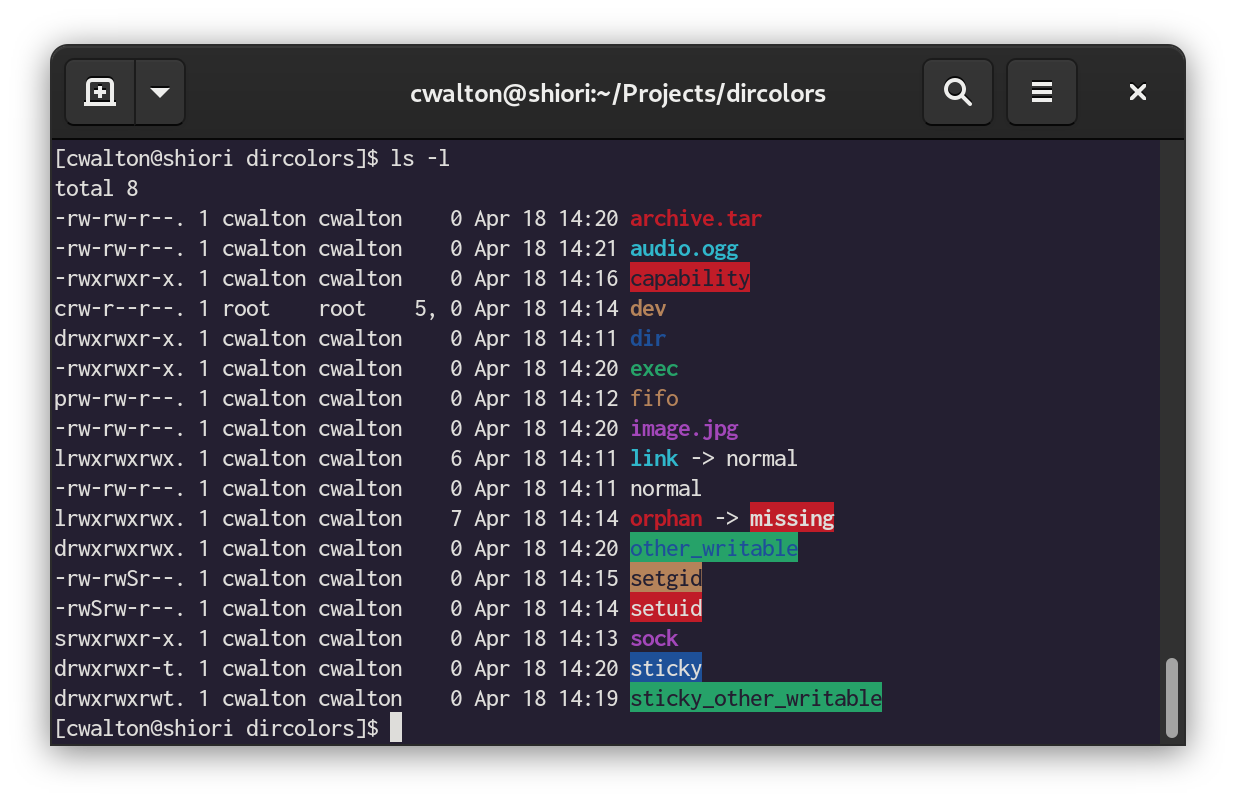
The XTerm and VGA palettes with “Show bold text in bright colors” enabled to replicate the behaviour of real XTerm and VGA consoles.
XTerm and Rxvt palettes are very similar; the main difference is that Xterm has a lighter, lower saturation bright blue. A real VGA console does not support bold text at all.
The Xterm palette suffers from bright cyan and green being nearly unreadable on the white background. The VGA palette is quite good, it appears that the default DIR_COLORS may have been optimized for the VGA palette specifically. The fifo is a bit low contrast due to the dark orange/brown shade, and the bright blue for directories is still a bit low contrast against the black background.
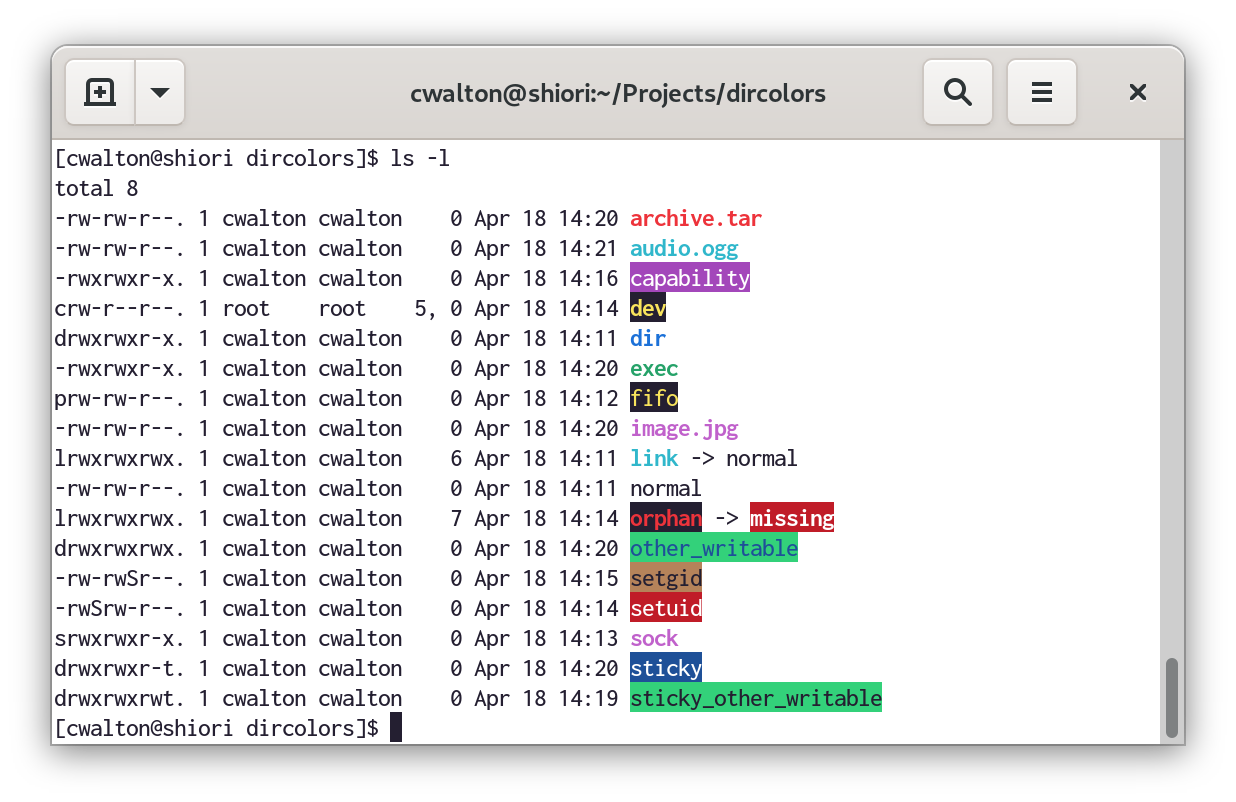
The GNOME 3.38 palette in light and dark modes, with “Show bold text in bright colors” disabled.
The current revision of the new GNOME palette is a compromise between the Tango and Xterm palettes. The lighter background colour in light mode improves contrast over Tango, while disabling the bold-is-bright option means the green is ok, and the cyan is, well, still not great. Contrast for the blue-on-green used for “other writable” directories is improved over Tango.
Dark mode with the new palette suffers a bit. Despite using a darker background than Tango, the dark red and blue colours remain very low contrast. The dark purple is a bit better than Tango. Enabling the “Show bold text in bright colors” option works around these issues.
Proposed modifications to DIR_COLORS
When used with the stock 8-colors + bold DIR_COLORS file that many Linux distributions use (and is shipped with coreutils), the new GNOME palette has better contrast than Tango in the light mode. The dark mode is about the same.
To improve dark mode in GNOME terminal with the “Show bold text in bright colors” option disabled, distributions should modify the DIR_COLORS file to use 16-colour terminal escapes to explicitly select the bright colors rather than relying on bold colors being shown as bright. I recommend making the following changes:
Replace the values “31”, “34”, “35”, and “37” with the values “91”, “94”, “95”, and “97” in all locations except OTHER_WRITABLE. This change causes the bright versions of Red, Blue, Purple, and White to be used as foreground colors.
The CAPABILITY, STICKY_OTHER_WRITABLE, and OTHER_WRITABLE file types use a dark foreground color. To improve contrast, a brighter background color can be selected: change “41” and “42” to “101” and “102” on these entries.
The FIFO and DEVICE types explicitly set a dark background, so using bright foreground helps improve contrast: change “33” to “93” on both entries.
CAPABILITY is pretty terrible in all colour palettes. Changing the background to purple rather than red allows it to have a white foreground, like SETUID. Use “97;45”
The result looks like this:
GNOME 3.38 palette with “Show bold text in bright colors” disabled, but a modified DIR_COLORS file that explicitly selects bright colours to improve contrast.
The brighter blue, red, and purple remain readable on a light background, and improve contrast on the dark background.
WCAG results for the new GNOME palette
These results assume the DIR_COLORS contrast improvements have been applied. Note that for places where bold text is used, I’m using the “Large text” contrast guidelines if the colors failed the normal text check. Spots where this was done are marked.
File Type
Colours
WCAG (Light background)
WCAG (Dark background)
Normal
No color code
AAA
AAA
Directory
Bold Bright Blue
AA
AA (Large text)
Link
Bold Dim Cyan
Fail
AA
Fifo
Bright Yellow over Dim Black
AAA
AAA
Socket
Bold Bright Purple
AA (Large Text)
AA (Large text)
Device
Bold Bright Yellow over Dim Black
AAA
AAA
Orphan
Bold Bright Red over Dim Black
AA (Large text)
AA (Large text)
Missing
Bold Bright White over Dim Red
AA
AA
SETUID
Bright White over Dim Red
AA
AA
SETGID
Black over Dim Yellow
AA
AA
Capability
Bright White over Dim Purple
AA
AA
Sticky, Other writable
Dim Black over Bright Green
AAA
AAA
Other writable
Dim Blue over Bright Green
Fail
Fail
Sticky
Bright White over Dim Blue
AAA
AAA
Executable
Bold Dim Green
AA (Large text)
AA
Archive
Bold Bright Red
AA (Large text)
AA (Large text)
Image
Bold Bright Purple
AA (Large text)
AA (Large text)
Media
Bold Dim Cyan
Fail
AA
I don’t think there’s much room to improve this more without using separate DIR_COLORS configurations for dark vs. light backgrounds. Changing the palette to reduce the brightness of Dim Cyan would improve the contrast of some file types with a light background, but it would hurt other applications that rely on Dim Cyan being readable over a Dim Blue background.
In theory, OpenWRT should work reasonably well with OSTree – it’s already designed to be run with an immutable base layer (for squashfs images).
In terms of adapting OpenWRT to run on OSTree, the hardest thing I can think of would be working out how to do the bootloader on embedded devices. I don’t know enough about this space to know what has to be done here. OSTree currently works by putting kernel images and BootLoaderSpec config files into a boot directory, swapping symlinks to switch between them. It can then run extra code to transform that config to a different format, e.g. Fedora Silverblue generates GRUB2 configuration. This last configuration transformation step is the only potentially non-atomic part of the update.
Other than that, some changes needed would be boot script integration for mounting the OSTree root (an overlay fs is not used, since /etc is writable), filesystem layout adjustments (/usr merge, and a wrapper for opkg (opkg-ostree?) that does package installs via an OSTree layer, similar to how rpm-ostree works on Fedora Silverblue.
Much of the existing system upgrade tooling would no longer be needed, since OSTree already preserves /etc (and would preserve /var if it was a real directory rather than symlink to /tmp) during upgrades. The process would be to download the new base image, rebuild the opkg-ostree layer with locally-installed packages, and reboot.
That said, OSTree also requires better storage than is present in many of the older embedded devices that OpenWRT supports – you need enough space for multiple images (albeit common files are shared with hardlinks), and all of the updates are done at the file level, so it has to handle a fair amount of small file writes properly. I run OpenWRT on an x86-64 box with a modern SATA SSD, which would have no issue. It looks like many newer router/ap platforms support eMMC flash, which should work well (maybe use F2FS filesystem).
Update (2017-06-22): After looking at the poor state of ECC support for a while, I ended up picking up an MSI B350 TOMAHAWK board, which does not support ECC. A variety of factors contributed to this, not the least of which that it had PCI ports legacy hardware support. The end result? I’m no longer actively researching ECC support on Ryzen boards, so this list is probably going to steadily go out of date. Please feel free to contact me if you have updates!
This is just a list tracking what is known about which AM4 motherboards currently on the market support running with ECC memory.
If you see (or have tested) anything not on my list, please drop a comment and let me know about it so I can update.
Overview by Brand
ASRock
So far, all ASRock B350 and X370 boards have the following text in the spec sheets:
– AMD Ryzen series CPUs support DDR4 3200+(OC)/2933(OC)/2667/2400/2133 ECC & non-ECC, un-buffered memory
Additionally, there’s been confirmation from ASRock that the X370 boards have working ECC. An ASRock support rep. says that all AM4 boards support ECC (But a commenter notes that the relevant options are missing in some bios versions). So it’ll probably work! When I find confirmation for specific boards, I’ll add it to my detailed list.
ASUS
Many of the ASUS X370 and B350 boards are currently listed with support for ECC memory (e.g. from the PRIME B350-PLUS):
4 x DIMM, Max. 64GB, DDR4 3200(O.C.)/2933(O.C.)/2666/2400/2133 MHz ECC and non-ECC, Un-buffered Memory
but the “ECC” part of that has gone and come again over different revisions of the spec page. Some reports say that you may need an updated bios on some boards.
Some ASUS boards have been confirmed to work, both by AMD techs directly and by user testing. Details in the table below where known.
Biostar
On product pages for all B350 and X370 boards, they list
Support Non-ECC & ECC Un-buffered DIMM Memory modules
I’m still looking for confirmation on whether ECC memory is functional, but it’s a good start.
Support for ECC Un-buffered DIMM 1Rx8/2Rx8 memory modules
but on the B350 boards:
Support for ECC Un-buffered DIMM 1Rx8/2Rx8 memory modules (operate in non-ECC mode)
which is pretty disappointing. It’s not clear exactly what “operate in non-ECC mode” even means (no EDAC?). I haven’t seen any tests yet to confirm either way.
MSI
There’s no mention of ECC in the specs list for any of the MSI boards. Status TBD, but I’m not optimistic.
Table of Infos
To get the “Works” status, I look for a review or test where someone has induced memory errors e.g. using Rowhammer, and has seen reports of corrected memory errors in the OS logs.
I found a backup of my old site, made in 2003 or thereabouts as best I can tell. Other than a couple dead link cleanups and removal of interactive elements (seriously, a guestbook?), it’s there almost as it was.
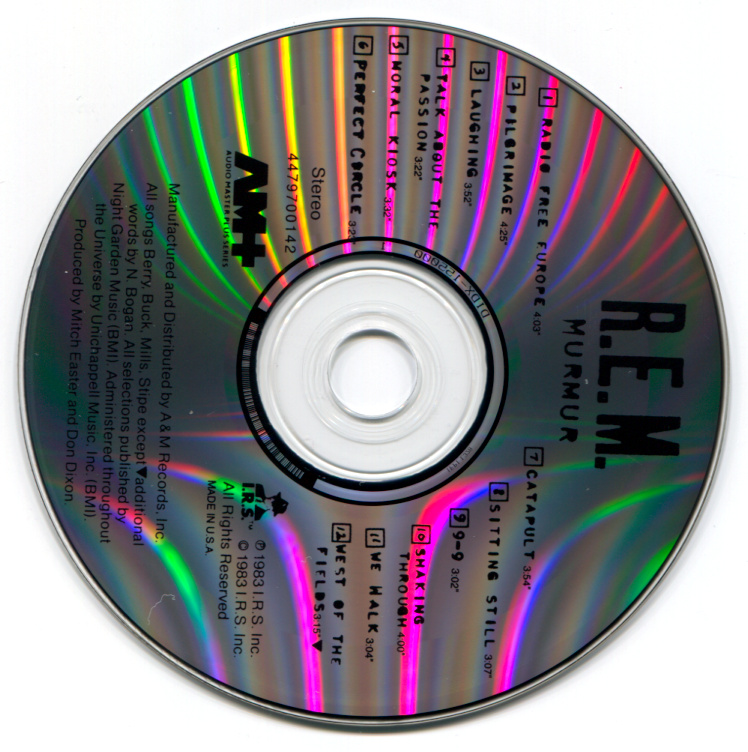
So, back on my recommended scanners post, I made a note that CCD sensor scanners that use LED lighting – which at this point is basically all of them – have an issue with scanning CDs. It looks like this:
This is, frankly, quite awful. It’s hard to read anything with the light pattern that appears, and it doesn’t look anything like the classic highlight that you see when holding a CD under a single light source, or on a CCFL-lit scanner. But I’ve finally found a solution!
One of the releases I picked up recently had its CDs in little translucent plastic sleeves. If I scanned the CD through the sleeve, rather than directly on the scanner bed, the rainbow pattern completely disappeared! It turned out that the frosted sleeve diffused the light enough to give a clean scan. Unfortunately, the sleeves that came with that release were too wrinkled to get good results, so I had to go look for alternate materials.
Here’s a quick list of currently available scanner models that I recommend for people doing album art scanning.
The Criteria
I’m not covering scanning 12″ vinyl in this guide. For that, you need a large format scanner, which is a completely different price category of professional equipment – or use a camera and a glare-free lighting rig instead.
There are two basic kinds of scanners currently available, distinguished by the type of image sensor: CCD and CIS (Contact Image Sensor). The difference is that CCD sensors have a much larger depth of field. This is important in particular if you’re scanning digipak cases – with a CCD sensor, you can scan right through the tray without disassembling the case. It also improves the quality when scanning exterior of boxes or thick booklets that don’t lay completely flat. CIS sensors can only get a sharp image if the thing being scanned is perfectly flat against the glass surface.
The scanner must be able to do 600dpi scanning (non-interpolated). This is pretty much a given at this point, of course, since even the cheapest current model scanner can usually pull off 1200dpi or higher. But keep this in mind when looking for used or older model scanners.
The scanner must be a direct-connection USB device. Many network scanners and all-in-one devices apply compression and pre-filtering that often can’t be disabled; this reduces the effectiveness of later descreening steps. Scanners marketed as “Photo” scanners are usually good at preserving fine detail without compression artifacts.